


Intricate wood inlay and marquetry patterns can transform a plain piece of furniture or woodworking project into a stunning showpiece. Skilled artisans have been embellishing fine furniture using various materials set into the wood surface for centuries. Woodworking inlay and marquetry techniques create beautiful designs, imagery and geometric patterns without complicated joinery or carving.
In this comprehensive guide, learn all about wood inlay basics as well as more advanced marquetry to take your woodworking skills to new heights.
| Key Takeaways |
|---|
| – Wood inlay involves inserting wood, plastic, or other materials into routed holes in a wood surface for decoration |
| – Marquetry uses numerous pieces of veneers to form intricate images and patterns |
| – Inlay and marquetry allow creative designs without needing advanced joinery skills |
| – Main tools: router, scroll saw, fret saw, chisels, sandpaper |
| – Veneers, lumber, exotic woods, plastics, crushed stone, wire, shell, leather used |
| – Precisely cut and fit fragments, glue in place carefully |
| – Sand and finish smoothly using processes similar to fine furniture |
| – Inspiration: artwork, nature, cultural symbols, historic motifs, custom text |
What is Wood Inlay?
Wood inlay adds another dimension and texture to plain wooden surfaces. It is the process of inserting different types of wood, plastic or other materials into routed holes or channels on the wood host surface beneath it. The inlaid material may contrast or coordinate for striking visual interest.
Inlay can range from simple dot patterns to intricate landscapes, lettering and geometric designs. It allows limitless creativity without needing to carve or use specialty joinery. Building the perfect canvas and tightly fitting each inlay piece takes patience and precision. But the stunning results are worth the effort for woodworkers of all skill levels.
Benefits of Wood Inlay
Some benefits of incorporating inlay techniques in your projects include:
- Adding style without advanced joinery skills
- Contrasting colors and textures
- Personalized designs and motifs
- Greater stain and finish options
- Less waste since small pieces are used
- Repurposing scrap wood cutoffs
For small accents to furniture or decor like boxes, frames or cutting boards inlay elevates the overall aesthetic beautifully. Intricate marquetry patterns covering large surfaces make any amateur work look like a master created it!
Marquetry Fundamentals
While inlay may feature just a few elements, marquetry blends together countless pieces of veneers to form intricate images and patterns. The term comes from the French word marqueter meaning ‘to checker’ since it was often used on chess boards. But today marquetry applies to any design made up by assembling various species of cut wood or other materials.
The marquetry technique dates back as early as the 17th century during the peak of Baroque furniture making. Some of the most famous marquetry masters like André-Charles Boulle (1642-1732) became so iconic entire furniture styles are now named after them.
Today you’ll still find marquetry used to create everything from jewelry boxes to bookmatched guitar tops. The core process remains largely unchanged for centuries:
Marquetry Step-by-Step
- Create a paper marquetry pattern
- Trace shapes onto various veneer woods
- Precisely slice pieces with a fret or scroll saw
- Arrange veneers creating your image
- Glue in place on background wood
- Sand, stain, varnish and polish
It takes extreme focus and painstaking precision with specialty tools like chevalet de marqueterie saw tables. So developing true marquetry mastery demands great skill and commitment.
Next we’ll explore key tools and fundamentals needed to start experimenting with your own inlay or marquetry projects as beginners.
Wood Inlay Supplies & Tools
Some basic supplies and tools allow anyone to add beautiful inlay accents with ease. Collect these wood inlay essentials to begin enhancing your woodwork:
Wood Inlay Tools
- Router – For quickly removing wood surface material
- Straight router bit – Cut uniform channels and cavities
- Chisels – Chop out waste material and fit small pieces
- Portable drill – Drill holes or drive pocket screws if needed
- Scroll saw – Detail work cutting curves and interior cutouts
- Fret or jeweler’s saw – Precise control for delicate marquetry
- Sandpaper – Smooth rough edges for a seamless finish
Wood Inlay Materials
- Wood veneers – Very thin sheets ideal for marquetry
- Lumber cutoffs – Use contrasting wood species and grain patterns
- Specialty wood – Exotics, burls, dyed veneers or color-stabilized woods
- Plastics – Acrylics, resin, raffia, straws or vinyl films
- Crushed stones – Turquoise, malachite and semi-precious gems
- Wire – Silver, copper or brass metal threads
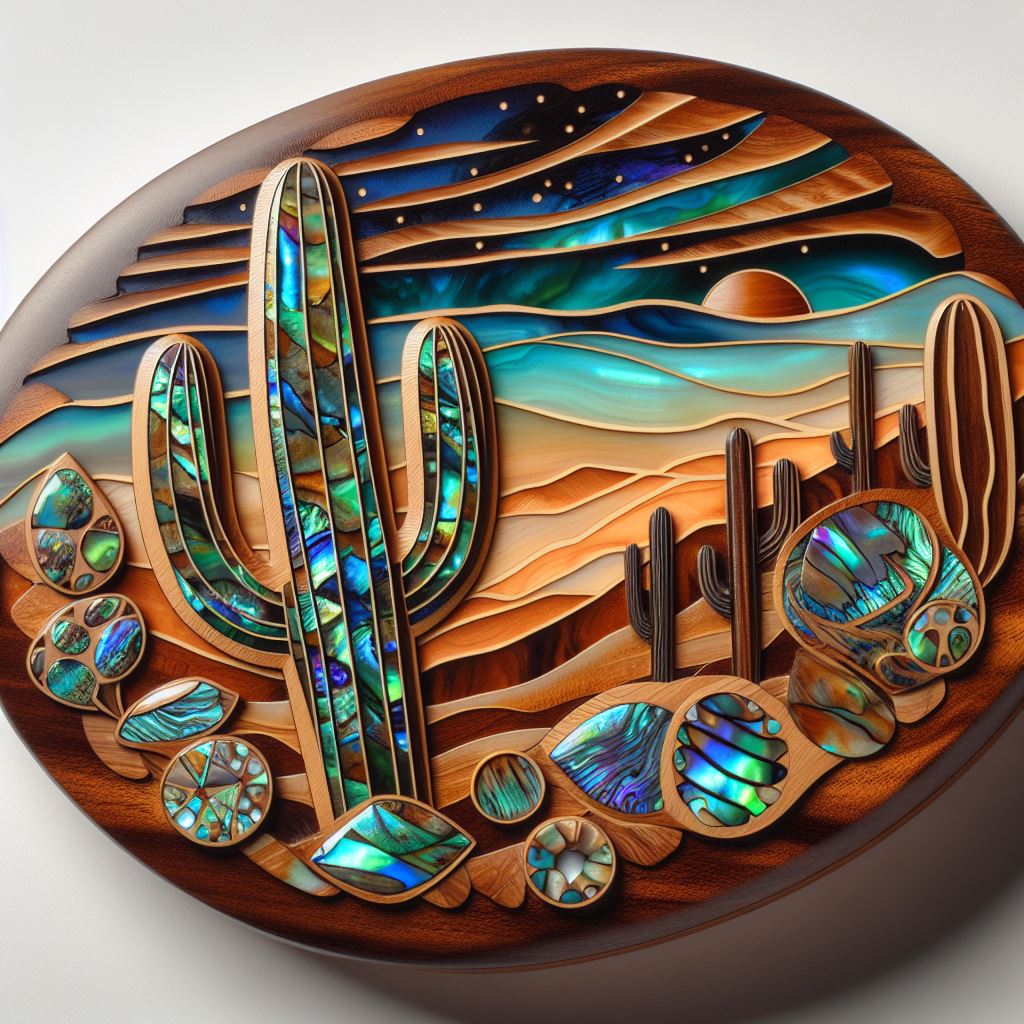
- Shell – Mother of pearl, abalone, etc for coastal motifs
- Leather/felt – For southwest or arts & crafts style accents
Always choose materials that can withstand the wood expansion/contraction and climate changes in your region. Your assortment of wood inlay supplies lets you add custom details for various project aesthetics.
Cutting and Fitting Inlay Pieces
With your pattern complete and materials selected its time to transform the flat marquetry design into precisely shaped elements. Cutting and fitting each fragment to conform perfectly inside its allocated space makes or breaks an elegant final result.
Scroll saws allow intricate interior cutouts while table saws slice long clean edges. Which power saws you have available dictate which inlay layouts work best. Coping saws, razor blades or specialty marquetry saws all play a role too.
You can hand carve inside curves as needed with sharp chisels for custom shaping. While patience and manual dexterity are required, don’t be intimidated. Remember even master marquetry artists had to begin somewhere!
Tips for Cutting Inlay Pieces
- Secure thin veneers to sacrificial backer boards while sawing to prevent tear out
- Mark borders and register lines clearly before cutting any pieces
- Set blade depth only deep enough to cut through inlay material
- Work slowly and carefully following traced lines
- Save ample extra material until perfectly flush fit achieved
Test fit each fragment into its routed channel frequently as you trim down. Irregular gaps will compromise the professionalism of the final project. Precision is paramount for both structural integrity and visual appeal.
For intricate marquetry patterns number pieces on the backside to identify placement. Jigsaw puzzles became exponentially easier when inventors numbered the pieces, its the same concept. This prevents mix ups assembling hundreds of fragments after cutting.
Gluing and Clamping Inlays
Once satisfied with the fit of each component comes adhesive application for permanent assembly. Choosing the appropriate glues depends on your materials and whether surfaces will remain flat or follow contours.
Inlay Gluing Tips
- Dry fit pieces first before any glue applied
- Dab adhesive carefully to avoid squeeze out
- Place elements accurately following numbers
- Use brad nails if needed through some materials
- Rub firmly to transfer glue without gaps
- Tape pieces in place as you work
- Wipe away any excess right away
- Clamp overnight allowing full cure time
Cyanoacrylate “CA glue” works for most wood inlays thanks to its watery viscosity and rapid set time. Slow-set epoxy may give you more working time for marquetry. Be mindful of glue drying and open times when applying larger sections.
Painters tape straddling edges helps immensely to hold border pieces from shifting while positioning neighboring fragments. Applying even clamping pressure is imperative so review risks of denting delicate woods first.
Achieving a Flawless Finish
After the adhesive dries comes final trimming and surface preparation for finishing. Carefully sand off glue bumps, drips and overhangs with fine grit abrasives until perfectly flush. Any unevenness gets exponentially amplified by stains and topcoats so this step is crucial.
Fill the tiniest voids between pieces with cyanoacrylate glue, colored epoxy or custom mixed sawdust filler. Precision cutting and clamping prevents most gaps but mistakes happen to everyone. Natural characteristics of wood also lend to some irregularity.
Tackle finishing inlay and marquetry surfaces similar to fine furniture. Apply conditioning oil for even absorption before staining if desired. Use spray or wipe-on methods to prevent pigmented finishes from pooling.
Protect your carved masterpiece with multiple thin layers of high quality topcoats. Consider wax, lacquer, polyurethane or varnishes safe for your wood species. Be mindful of outdoor elements if used in garden pieces.
Inspiring Inlay Motifs and Patterns
Historically marquetry often depicted extravagant floral arrangements, MRs or geometric layouts. You can easily generate ideas adapting clip art, photos, sketches or purchased templates to make patterns. Trace these onto paper or transparent film to recreate with wood veneer.
Advances in digital graphics and CNC machining now allow for photo realistic imagery recreated in timber. This progression means inlay no longer requires labor intensive handwork to achieve incredibly nuanced realism. Some options for sourcing unique designs include:
- Original Artwork – Transform your own drawings or children’s sketches
- Nature elements – Leaves, seeds, butterflies, seashells etc
- Cultural symbols – Family crests, company logos, religious icons
- Historic motifs – Art nouveau, arts & crafts era patterns
- Custom engraving – Names, dates, titles or quotes
Don’t limit yourself to just wood either. Mixing in crushed stone, wire accents, casting resin or foil leaf inserts exciting possibilities too. Just ensure balancing beauty with practicality suits your project style and intended purpose. Browse home decor stores for additional inspiration adapting mosaic or tile motifs into woodwork.
FAQs About Wood Inlay Techniques
What types of wood work best for inlay?
Dense exotic species with colorful grain patterns or stark contrast to the base wood make excellent inlay. Some top choices include Bloodwood, Cocobolo, Ebony Gabon, Pink Ivory or Purpleheart.
Should I use stains or dyes on inlays?
Sometimes yes if you want to alter color tones. But test reactions first not all woods accept pigments evenly. Overdying can ruin carefully selected multi-colored patterns.
How thin should marquetry veneers be sliced?
Ideally 1/4” or thinner maximizes pliability for complex shapes. Well under 1/16” qualifies as true marquetry allowing intricate details.
Can I use epoxy resin mixed with dye powders or pigments as inlay fill?
Absolutely! Colored casting resins create vivid effects for beaches, rivers or abstract art designs. Automotive paints work too.
What finishes work over wood inlay accents?
Most film building topcoats like polyurethane or conversion varnish fully encase to protect. Considering VOC levels some makers prefer natural oils or waxes alone.
Should I avoid sunlight, heat or moisture on marquetry pieces?
It really depends on wood species stability and climate. Allowing acclimation first is wise. Use UV inhibiting finishes for outdoor projects prone to fading.
How do I fix gaps that appear between inlay pieces later on?
Carefully clean out voids then refill with preferred adhesive like CA glue. Seasonal expansion/contraction does lift edges over time.
Take Your Inlay Artistry Further
We hope this beginners guide to effective wood inlay and intricate marquetry gives you confidence trying these decorative techniques yourself. Don’t be surprised if you get hooked expanding beyond basic inlay into elaborately patterned marquetry once you discover how gratifying it can be!
Feel free to join in discussions with other member on the woodworking community forums. Share photos there of stunning inlay projects you create or ask questions anytime. Our friendly experts offer guidance taking skills to the next level whether you are just starting out or have years of experience.
Soon your custom furniture, carvings, boxes and decor elements will showcase stunning inlay motifs that make people wonder where you sourced such exquisite woodwork!
Below are three external links that could be relevant to this article:
https://www.youtube.com/watch?v=yvhnVojt_bY
https://www.goodreads.com/book/show/124082365-how-to-inlay-wood
https://www.familyhandyman.com/article/wood-inlay/